All About Meringue

baked swiss meringue cookies filled with berry jam

baked swiss meringue cookies filled with berry jam

Earlier this week, after spending the last few days working on custard recipes and special order cakes, I found three deli containers of egg whites shoved in the back of my fridge. In an effort to curb food waste and do a little deep dive on here (because it’s been a while), we’re going to spend the day talking about all things meringue—aka, the most fun thing to make with all of your extra egg whites. So let’s get started!

Also, if you’re someone who isn’t into reading and wants a much shorter meringue run-down, you can find a 30 second reel on my Instagram!

What is meringue?

First off, what exactly is meringue? Simply put, meringue is the combination of egg whites and sugar, whipped to create semi-stable air bubbles. It can be baked, piped, buttercreamed, torched…really, the possibilities are endless. Egg whites are made up of water and protein. When they are whipped, the protein strands begin to unravel and they create little stretchy networks that capture the water and air bubbles. (This is what happens when you whip egg whites without sugar for folding into a batter. When baked, those air bubbles create steam and function as a leavening agent.) When sugar is added to the mix, it helps to stabilize the foam and create elasticity, giving us swoopy, glossy meringue. Occasionally, an acid such as cream of tartar or lemon juice is added to give an extra bit of stability insurance, but it’s not a necessary ingredient in the meringue-making process.

italian meringue

italian meringue

While there are a multitude of meringue processes and methods, the three most common types of meringue are French, Swiss, and Italian. Each use the same base ingredients (egg whites + sugar), but each have a slightly different methodology which results in different levels of stability and different usages.

French Meringue

French meringue is also sometimes called “common meringue” and it is the simplest and most straightforward type. Egg whites are placed in a clean mixing bowl and whipped until they begin to froth. Then, sugar is gradually streamed in (while whipping), and after all of the sugar has been added, mixing speed is increased until the meringue reaches your desired stiffness (*see tips and tricks below). When making French meringue, take care not to add all of the sugar at once, or it will weigh down the egg whites, preventing all of those air bubbles from forming. Because French meringue uses raw egg whites, it must be baked, often at a very low temperature, until crunchy on the outside and the bottom of the meringue can be lifted off of the pan. French meringue is a great base for pavlovas, meringue cookies, and eton mess. French meringue is the least stable type of meringue and should be baked immediately to prevent separation and weeping.

Swiss Meringue

Swiss meringue is my very favorite of all the meringues because, IMHO, it’s the most versatile. Swiss meringue is the second most stable meringue and is can be used in really any application. Want to bake it like a French meringue? Go for it. Looking for a buttercream base? Meet your BFF, Swiss meringue. Interested in torching it on the side of a Baked Alaska? Swiss is here for you. To make Swiss meringue, egg whites and sugar are combined in a heat-proof bowl and then placed over top of a pot of boiling water. They are cooked, stirring frequently to prevent scrambling, until hot to the touch and all of the sugar has dissolved. The mixture is then transferred to a mixture and whipped until room temperature, glossy, and beautiful.

Italian Meringue

Finally, we have Italian meringue. Italian meringue is the most stable type of meringue, and is often considered the most difficult type. She's gonna make you work for her stability. I wouldn’t say the Italian meringue is difficult, just a little tricky. Egg whites are added to the bowl of a mixer and then set aside for a bit. Meanwhile, the sugar is combined with water in a saucepan and cooked to a syrup (242°F). While the sugar is cooking and when it is starting to get close to that perfect syrup temperature, you begin whipping your egg whites. Ideally, your egg whites will be starting to froth just as your syrup reaches 242° F and that’s when the real fun happens. The hot syrup is slowly streamed into the whipping egg whites. When all of the syrup as been added, the mixer speed is increased and the meringue gets whipped until cool and elastic. It takes a little practice, but once you’ve mastered the temperature and the syrup drizzle, Italian meringue makes the best buttercream around town.

P.S. there is a great, very versatile Italian meringue buttercream recipe, as well as a French meringue pavlova recipe + even more on meringues, in my e-book, Pastry Foundations

bananas foster eton mess made with French meringue, recipe coming soon

bananas foster eton mess made with French meringue, recipe coming soon

What can you do with meringue?

Meringue can be used in many different applications and is the base of some of our favorite desserts. Baked meringues can be made into pavlovas or cookies, topped with fruit, jams, whipped cream, nuts…pretty much anything. Maybe the most common application is buttercream. For both Swiss and Italian meringue, room temperature butter can be added to room temperature meringue to create a very smooth, buttery frosting. Swiss and Italian meringues can be piled on top of finished pies, like this Key Lime Pie, and torched in place of whipped cream, while French meringue can be baked atop your favorite pie or tart. Italian meringue is also the base of homemade marshmallows.

Meringue Tips and Tricks

  • When it comes to working with meringue, cleanliness is your best friend. Egg whites can be a bit finicky and will refuse to whip if there are any traces of fat near them. This means that you should make sure that your bowl is clean and that there are no little wisps of egg yolk in your whites.

  • Cleanliness is also important when it comes to sugar. Make sure that there are no large clumps or little foreign specks in your sugar, as these can weigh down your whites or cause crystallization.

  • The fresher the egg, the better your meringue. If you’re struggling with your meringues and the egg whites don’t seem to be whipping properly, they may be too old. Dump it out and try with fresh eggs.

  • Heat and humidity do not play well with meringue. Once baked, store meringue in a cool, dry place to prevent stickiness and collapse.

  • Most of the time, meringue done-ness is discussed in terms of peaks—soft, medium or stiff. I usually like to explain the difference between the three by using pictures, but I’ll try to use my words to help you create a picture in your head. When you remove the whisk from the bowl, the meringue at the top should create a tip. If the tip immediately falls back over onto itself, you’ve reached the soft peak stage. If the tip stays upright, but the very top of it falls back onto itself creating a little wave look, you’ve reached medium peaks. If, when you pull the whisk out of the bowl, the tip stands upright, you’ve reached the stiff peak stage.


Print Friendly and PDF

more meringue recipes

PavlovaswithBerries2.jpg

brown sugar pavlovas with mascarpone cream

angledtorched1.jpg

key lime pie

Cake10.jpg

chocolate cake with chocolate milk swiss meringue buttercream

Puff Pastry

lamination4.jpg

If nothing else, this quarantine period has given us a bounty of time. People who have never had interest in baking before are suddenly churning out loaves of sourdough on a regular basis. We’re signing up for free photography/painting/writing classes online, and working on becoming gardeners or teaching ourselves how to give haircuts. The phrase “It’s a great day to learn something new” has never been truer, so in that ultra-motivated spirit, let’s learn to make puff pastry at home!

Puff pastry is a bit of an outsider in the pastry world. It’s like that person who is friends with everyone so they don’t fit squarely into a specific group (but their versatility makes us love them even more). Puff pastry is a laminated dough, like croissants and danishes, but because it doesn’t use yeast or natural leavening, it’s not technically considered a viennoiserie (the French word for leavened pastries with added sugar, butter, eggs, and usually laminated—its the bridge category between breads and pastries). There are four main types of puff pastry, and I would venture to say that three of them are best left up to professional bakers with sheeting machines in order to save a lot of headaches. Traditional puff pastry is sheeted similarly to croissant dough, with a detrempe (dough) that envelops a butter block that’s then rolled and folded to create lots of flaky layers. Italian puff pastry includes eggs and white wine in the dough and is mixed more intensively than other puffs. Inverted puff pastry laminates the butter on the outside of the dough, rather than the inside creating a flakier, crispier pastry (and really needs fancy equipment like a reversible dough sheeter, which I unfortunately do not have the space or money for in my tiny duplex kitchen). Finally, blitz (or rough) puff pastry is the most basic and quickest puff pastry and it’s what we are going to learn today.

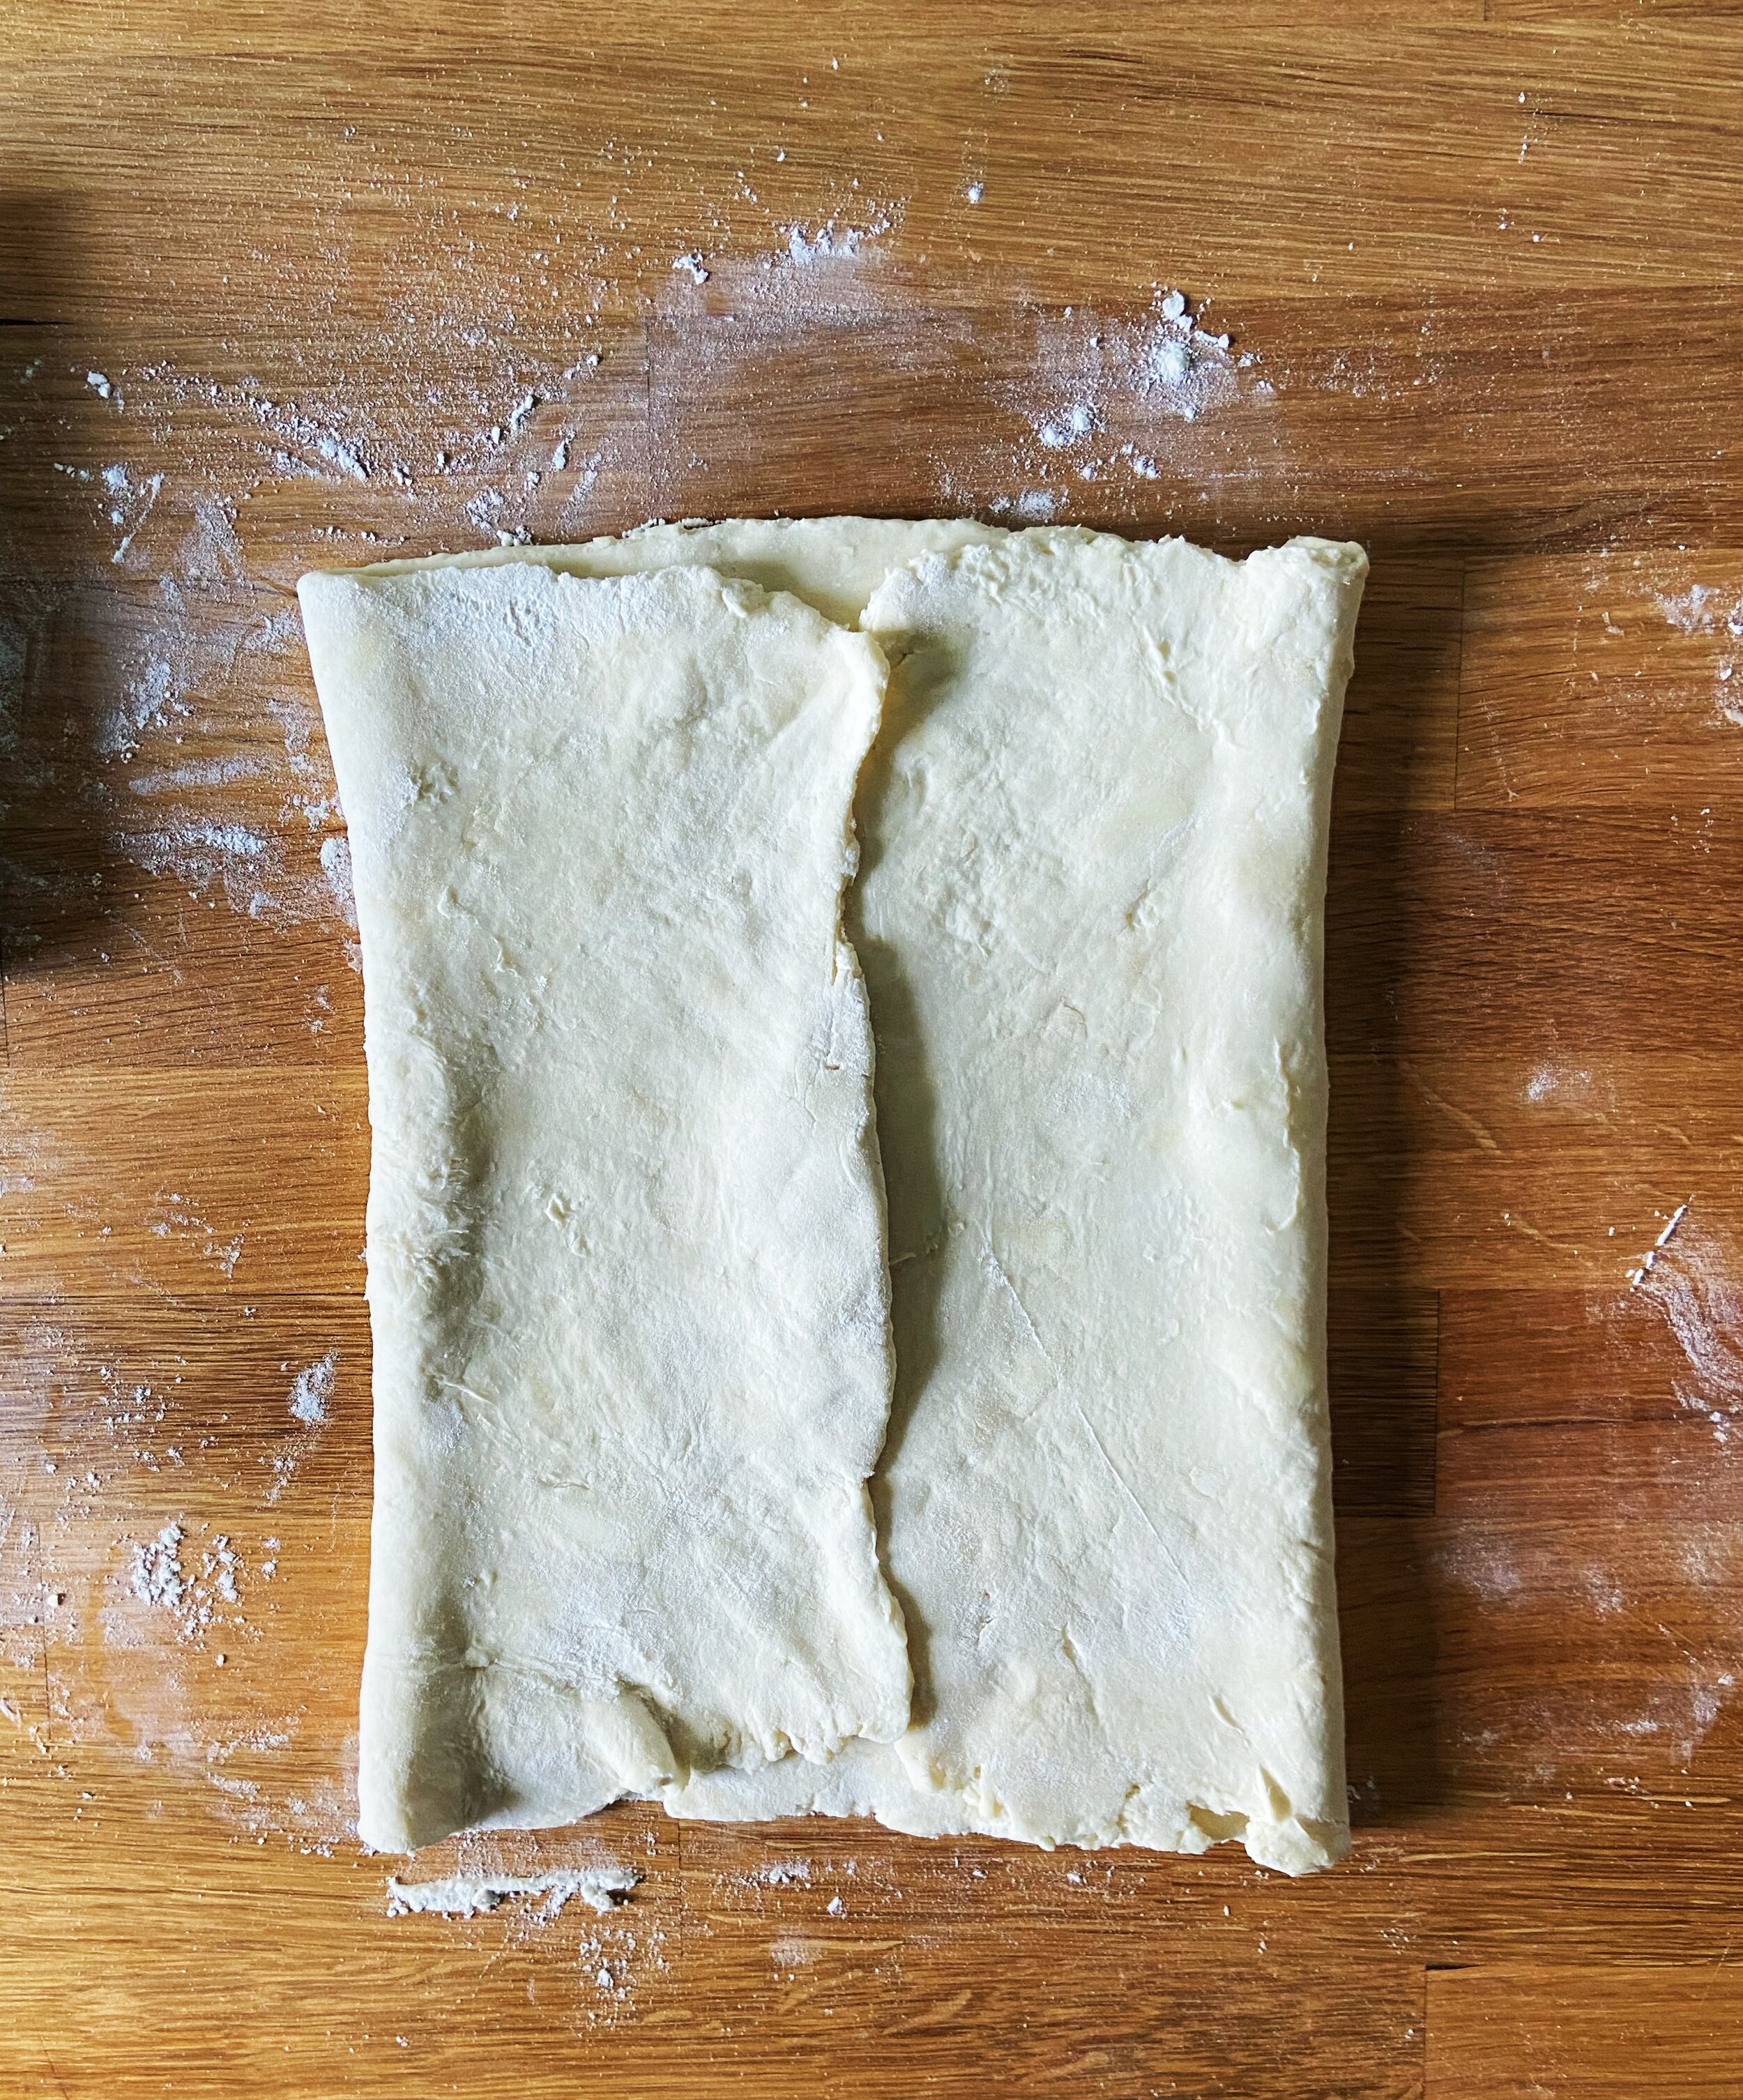
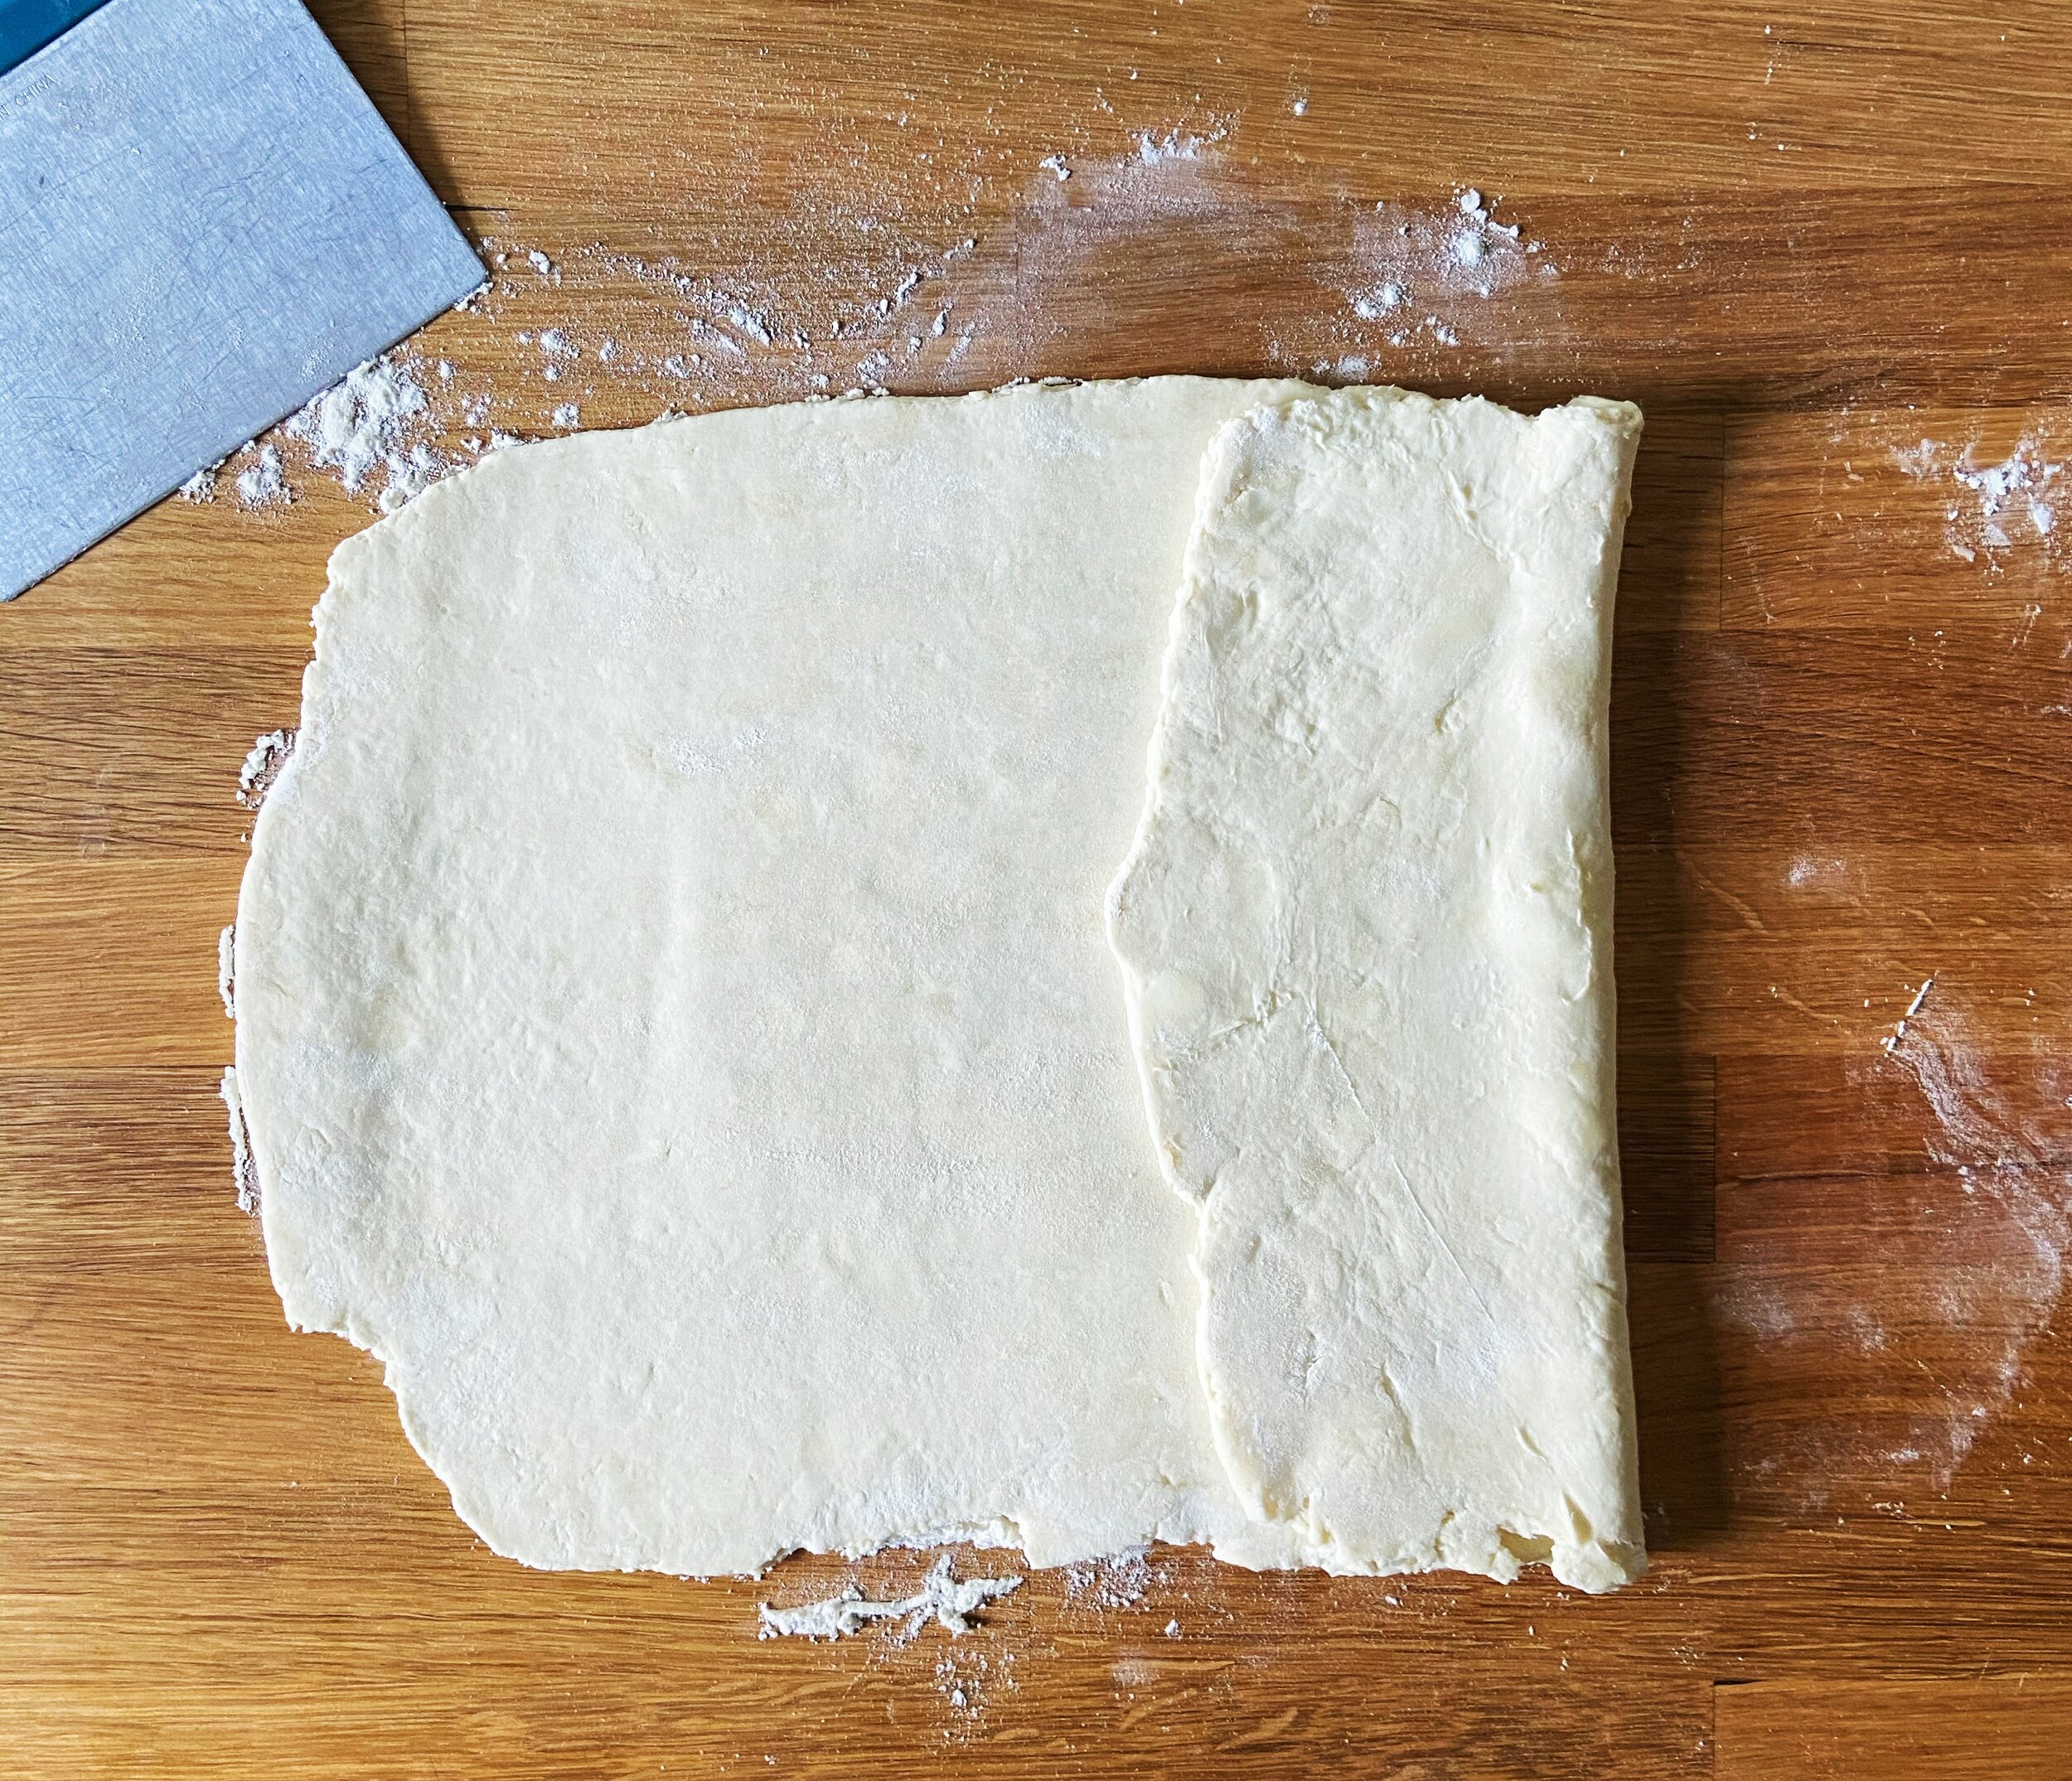
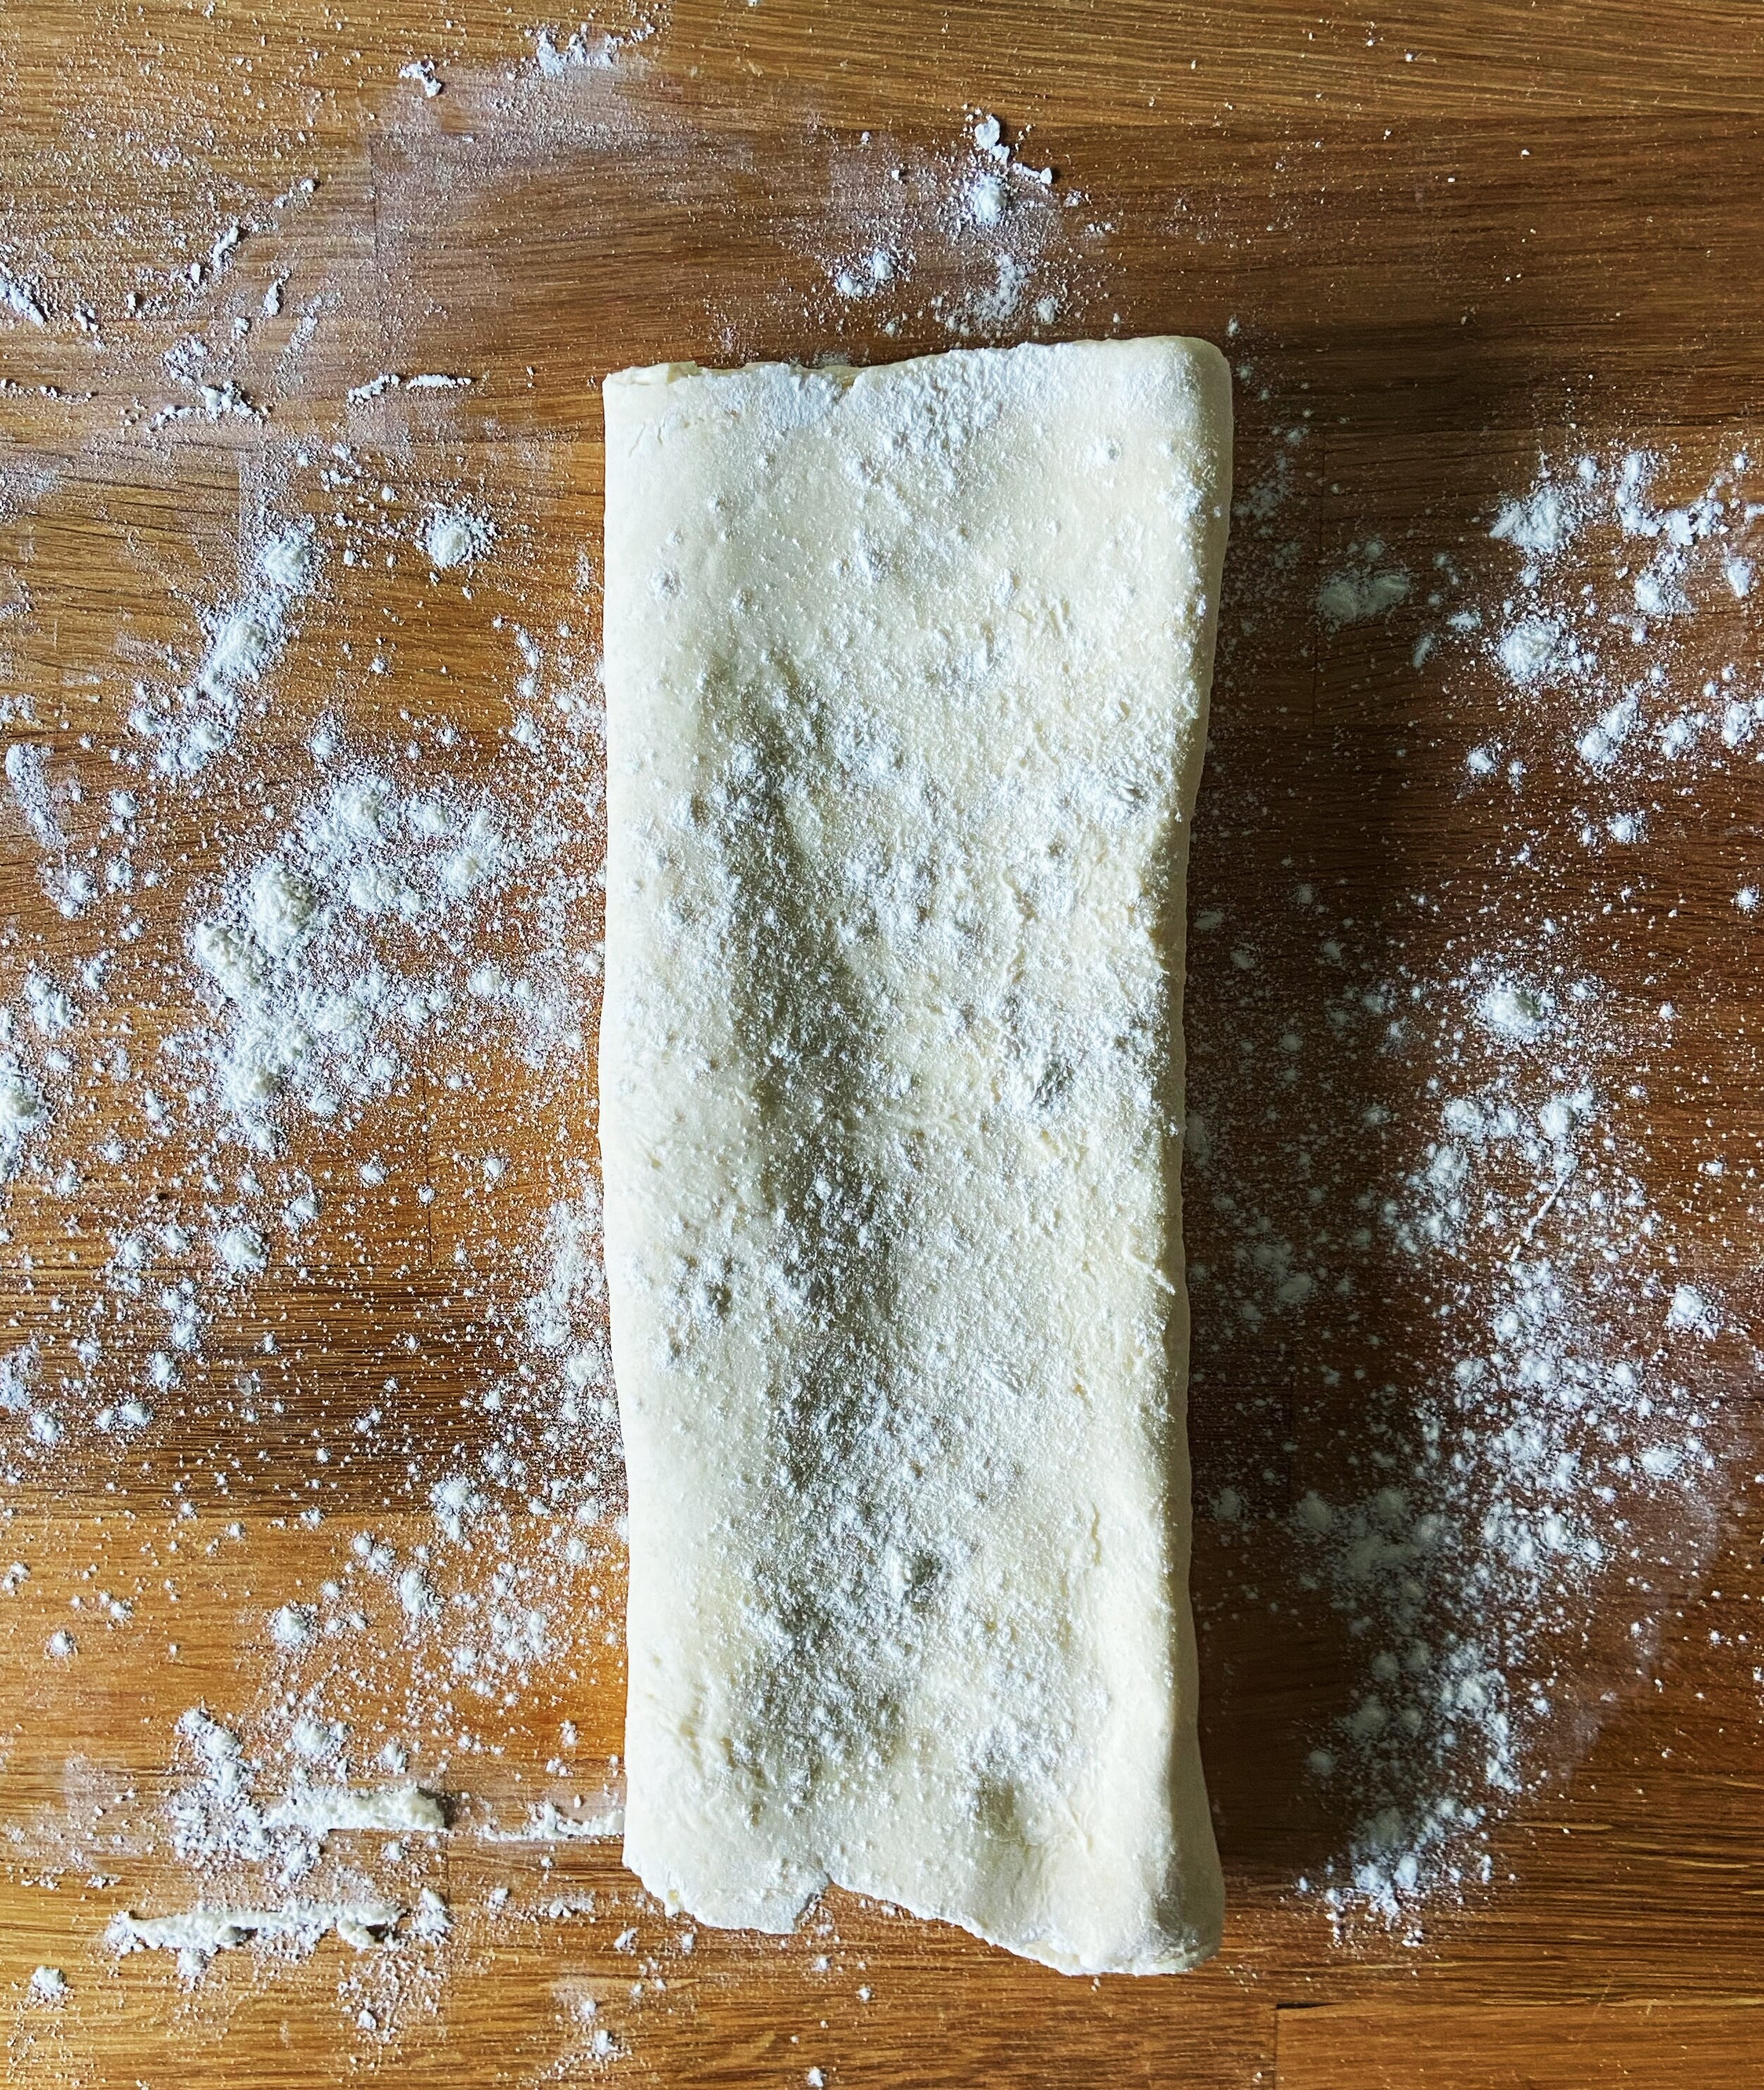
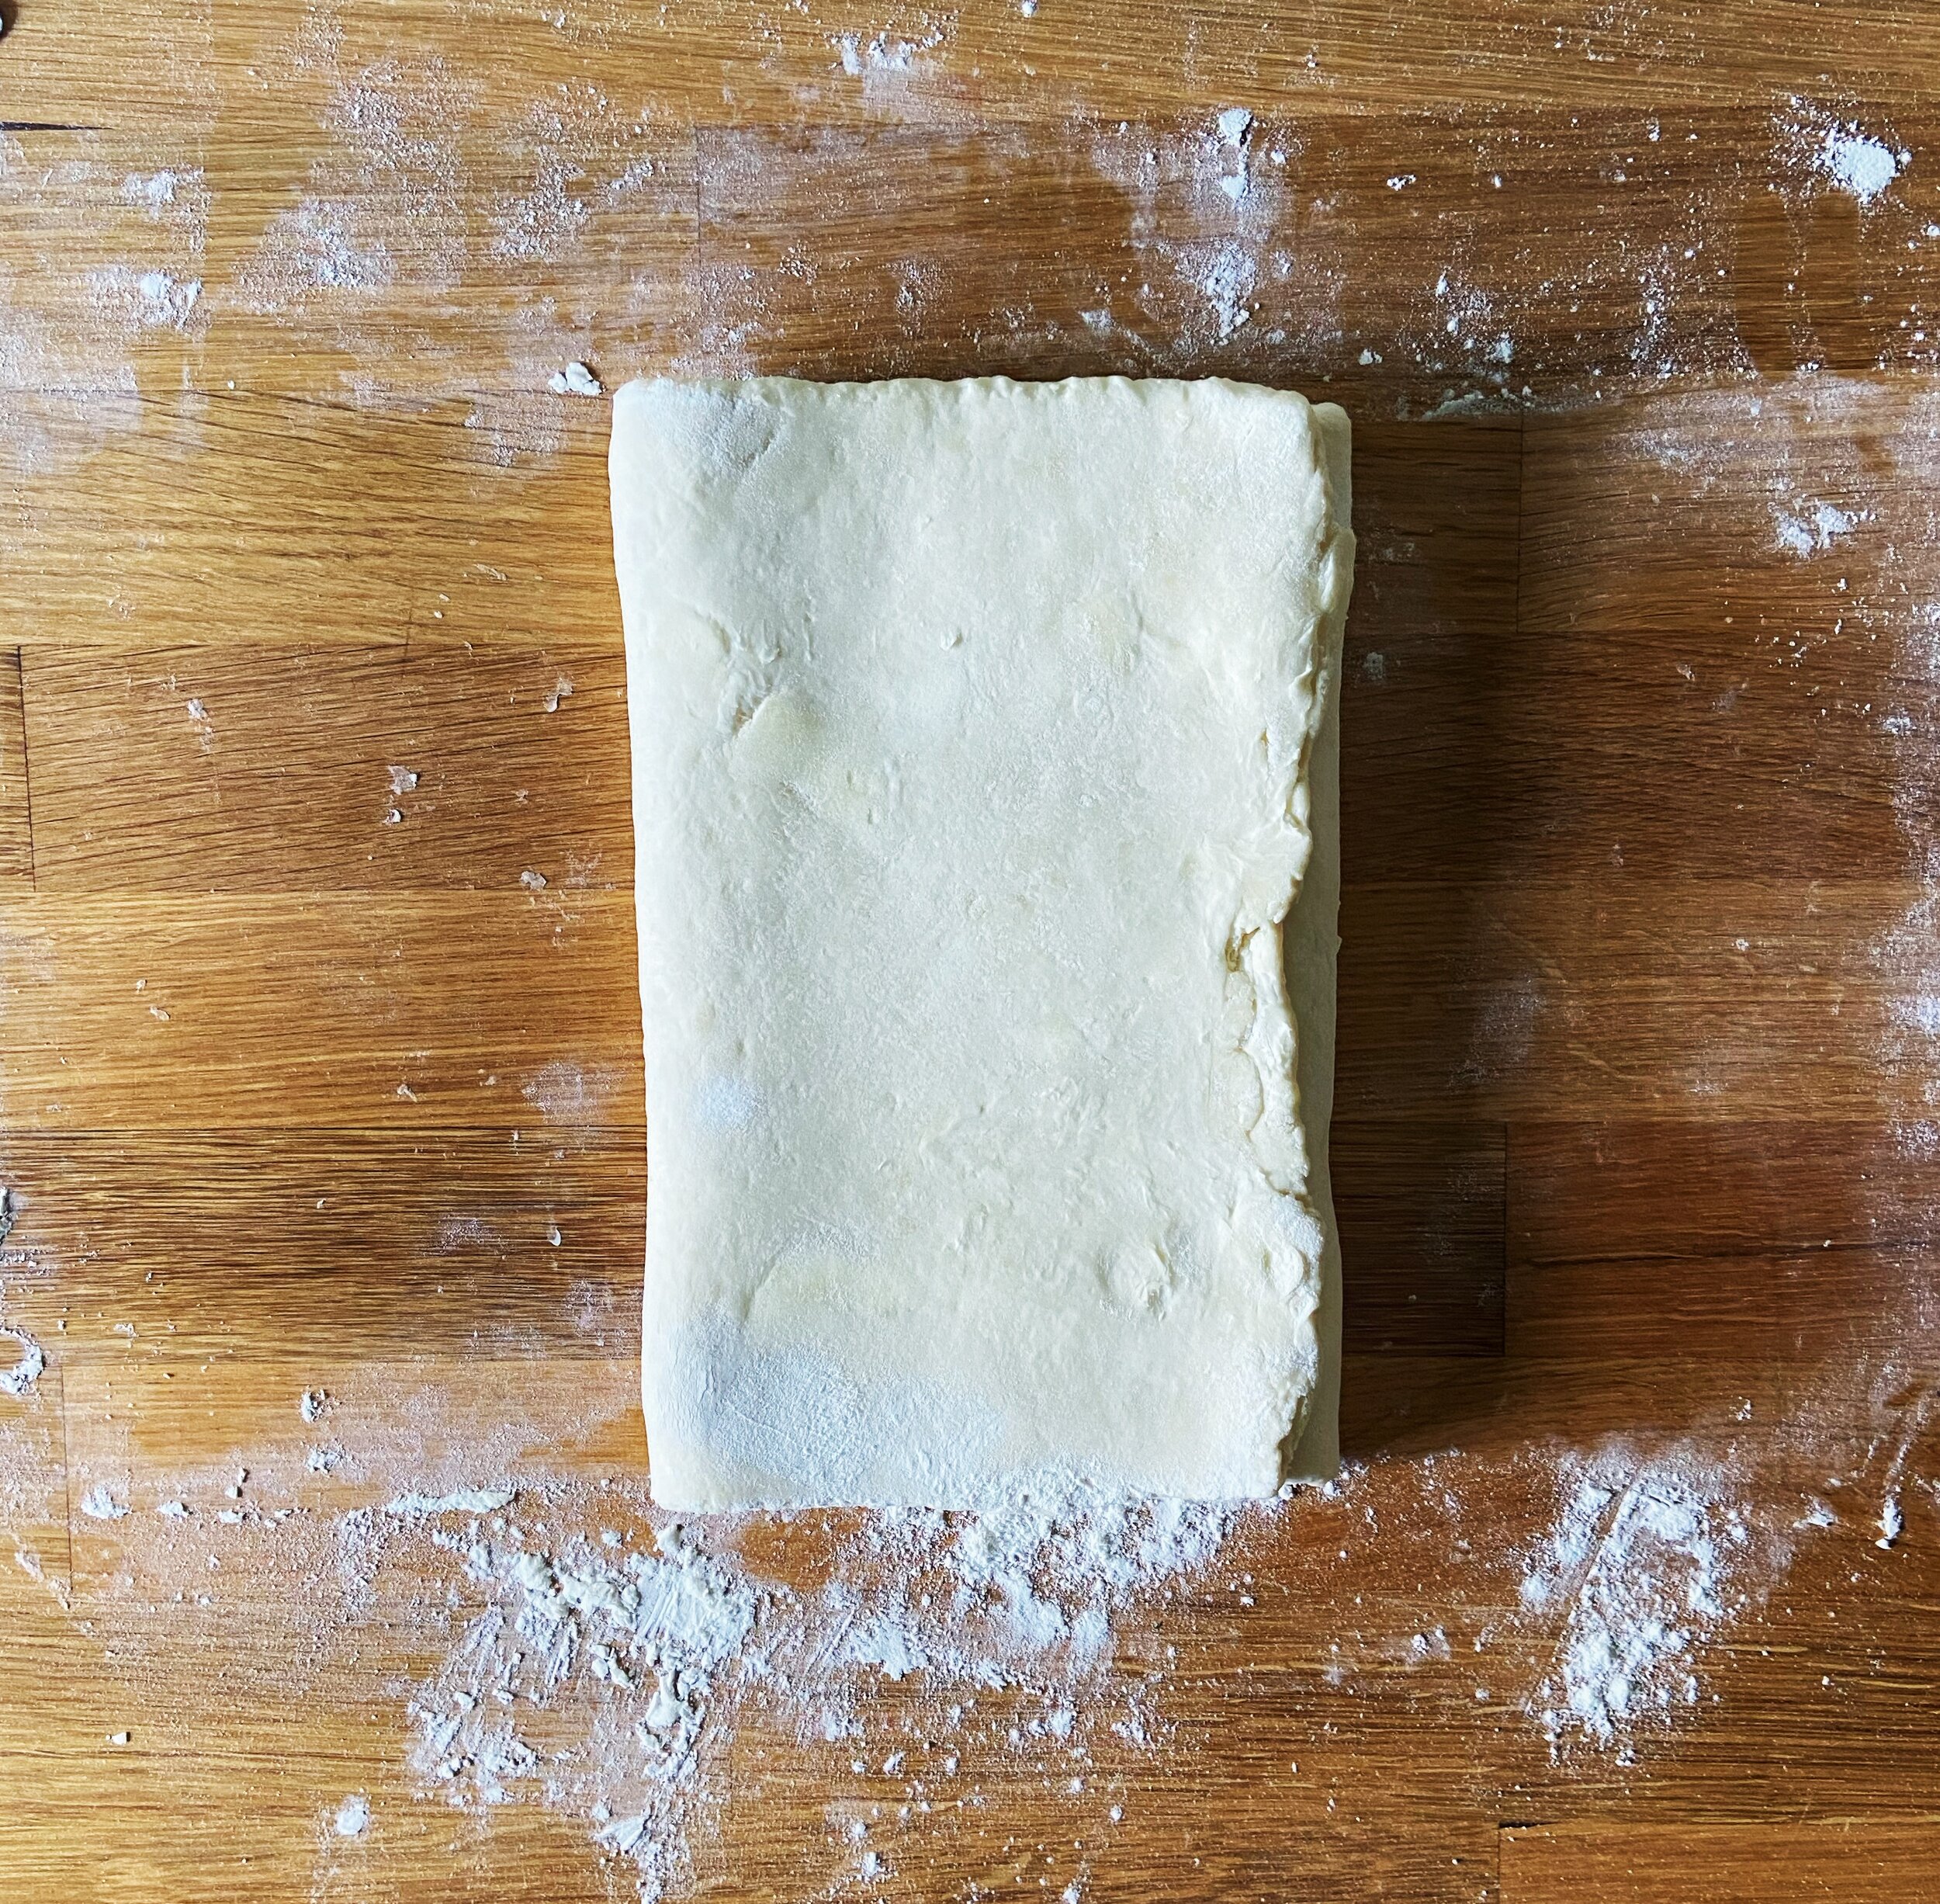
To make blitz puff pastry, cold butter is worked into the dough into pea-sized chunks, as if you are making a pie or tart dough. The dough is then given a series of folds over the course of a couple hours to create those flaky layers before it’s tucked in for an overnight chill. Below, I’ve broken down two of the most common types of dough folds, used in any laminated dough, and added pictures to help you better understand exactly what each should look like.

P.S. I’ll be sharing a few different recipes later this week that use this blitz puff pastry so keep an eye out!

Double Fold

A double fold is usually the first fold completed in a laminated dough. One of my professors in pastry school referred to it as the “church door fold” and it’s very much like closing doors. The dough is rolled to a rectangle and then the edges are folded in to meet in the middle, like closing a double door. The dough is then folded in half, like closing a book.

Single Fold

A single fold, or letter fold, is the most common laminating fold. The dough is simply rolled to a rectangle shape and then folded in thirds like a letter.


Blitz Puff Pastry 

Yield: 2 lbs puff pastry dough

Ingredients 

14 oz (397 g) all purpose flour

10.5 oz (298 g) unsalted butter, cold and cubed

2 tsp kosher salt

1 tsp lemon juice 

7 oz (198 g) cold water


Procedure 

  1. In the bowl of a stand mixer fitted with the paddle attachment, combine flour and salt. Mix on low speed for 30 seconds, just to combine. 

  2. Add the cold, cubed butter to the pie dough and mix on medium-low speed until butter is broken up into pea-sized cubes throughout the flour. This is should resemble pie dough and the butter should not be completely combined. 

  3. In a measuring cup, combine lemon juice and water. With the mixer running on low speed, gradually stream in water mixture and mix until just barely combined. Be careful here not to overmix!

  4. Turn the dough onto a well-floured work surface and gently press into a rectangular shape. Wrap in plastic wrap and refrigerate for 30 minutes. 

Lamination

  1. For the lamination process, we will complete a series of five folds in total in three intervals. *refer to the photos above for a visual reference of the folds*. 

  2. Turn #1: Remove dough from refrigerator, unwrap and place onto your well-floured work surface. Roll the dough into a large rectangle, 18x12” and is about 1/4” in thickness. Make sure that the 18” length of the dough is the horizontal end. Take the far-edge of the dough and fold it in, about 1/3 of the length. Then take the far-left edge of the dough and fold it 2/3 of the way in, until it meets the edge of the first fold just off-center of your rectangle. Grab the left side of the dough and fold it in half like you are closing a book. You will have just completed what’s called a double fold. Wrap the dough in plastic wrap again and return to the refrigerator to chill for another 30-45 minutes. 

  3. Turn #2: Remove the dough from the refrigerator and bring back to your well-floured work surface. This time, you will complete two single-folds. Again, roll the dough back out into your 18x12” rectangle with 1/4” thickness. Bring the right edge of the dough in 1/3 of the way, like you are folding a letter. Then bring the left edge of the dough over the right all of the way over the folded right side. This is one single fold. Turn the dough 90° so that the open sides are now facing horizontally. Roll the dough back out to your 18x12” rectangle and fold like a letter one more time. Re-wrap the dough and return to the refrigerator for another 30-45 minute rest. 

  4. Turn #3: This last turn will consist of the exact same folds as turn #2. Roll the dough out to the 18x12” rectangle, fold like a letter, and then turn 90° and repeat the whole thing. Re-wrap the dough tightly and return to the refrigerator. Let the dough rest overnight and then use however you would like! You can also divide the dough into two, 1-lb squares, wrap them individually and then freeze them for later use. If freezing the dough, be sure to let them defrost in the refrigerator overnight before you plan to use them. 


Note: When you are completing folds back to back, remember that the dough should always be turned 90° between folds so that the open edges are facing horizontally.

more recipes like this…

Croissants1.jpg

classic croissants

Baklava2.jpg

traditional baklava

Babka5.jpg

chocolate tahini brioche babka

plated1.jpg

fig and blue cheese rugelach

Print Friendly and PDF

Classic Sourdough


BarnSour8.jpg

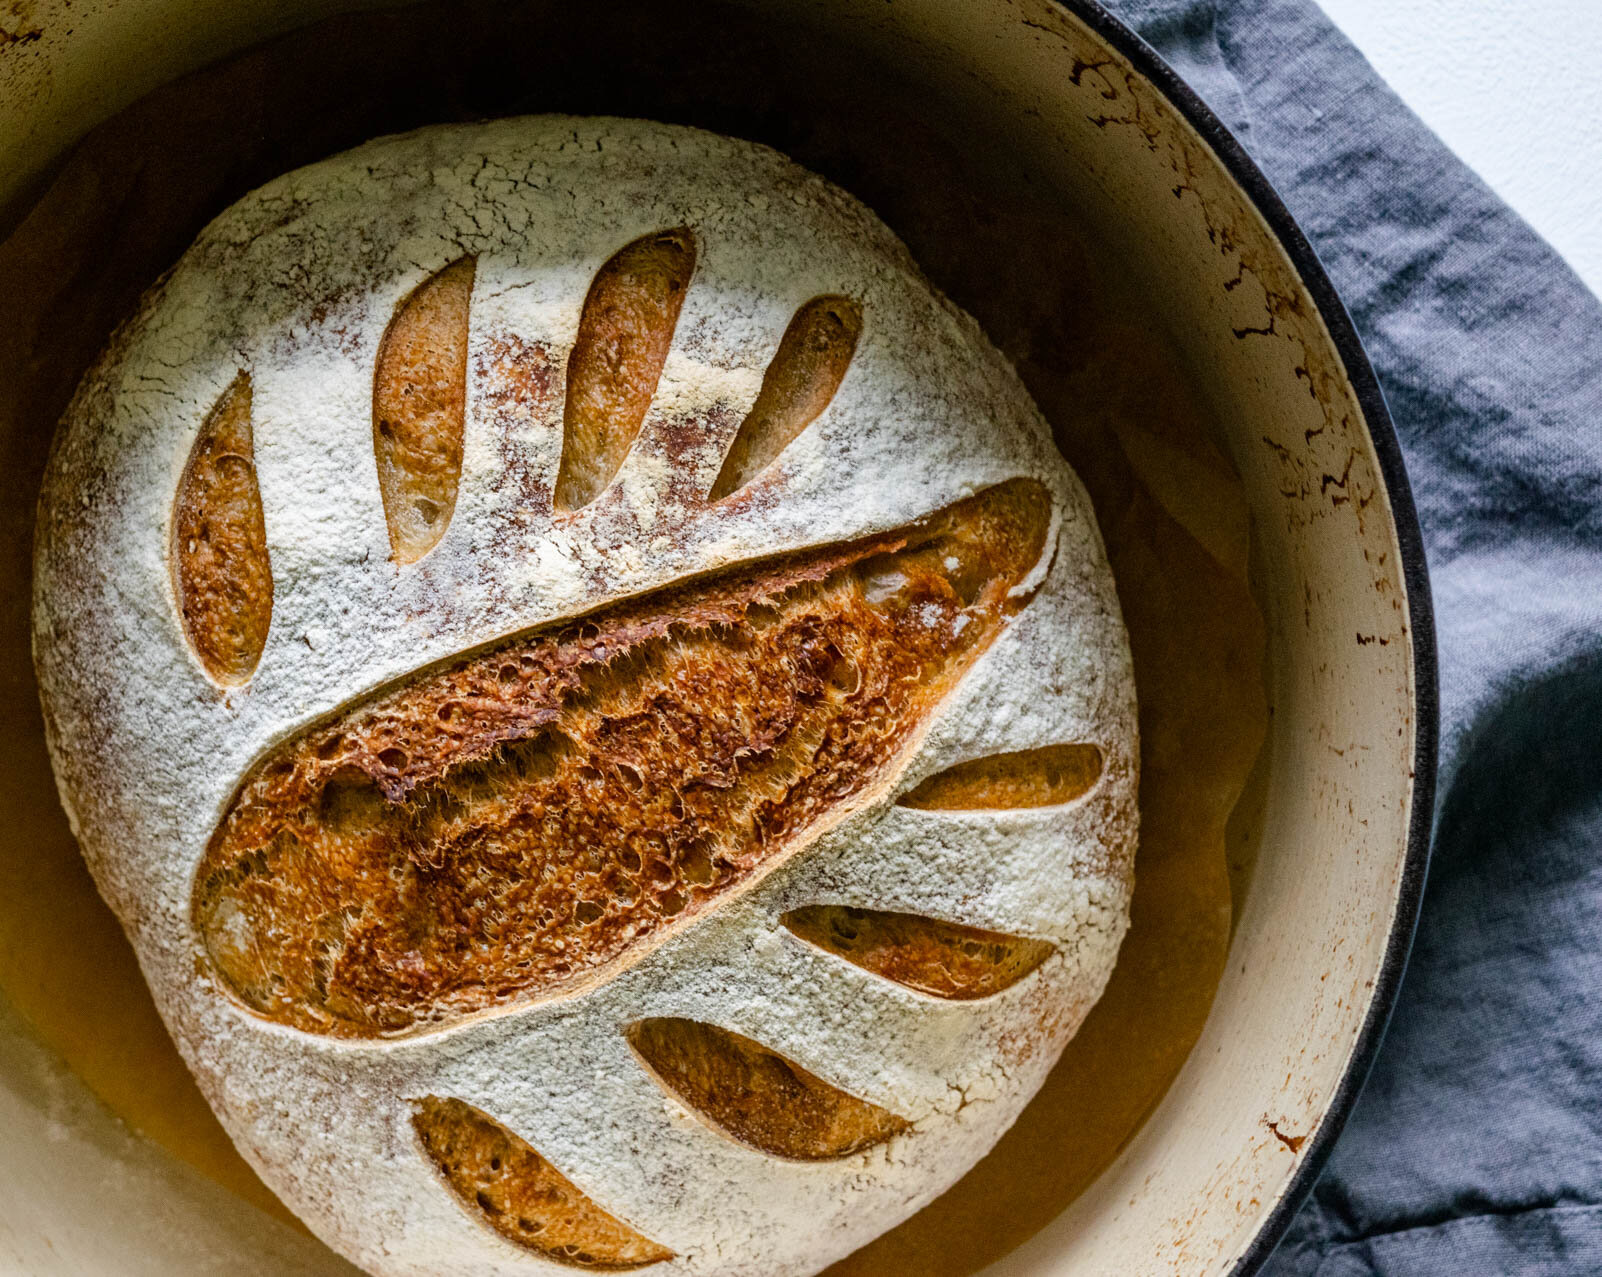
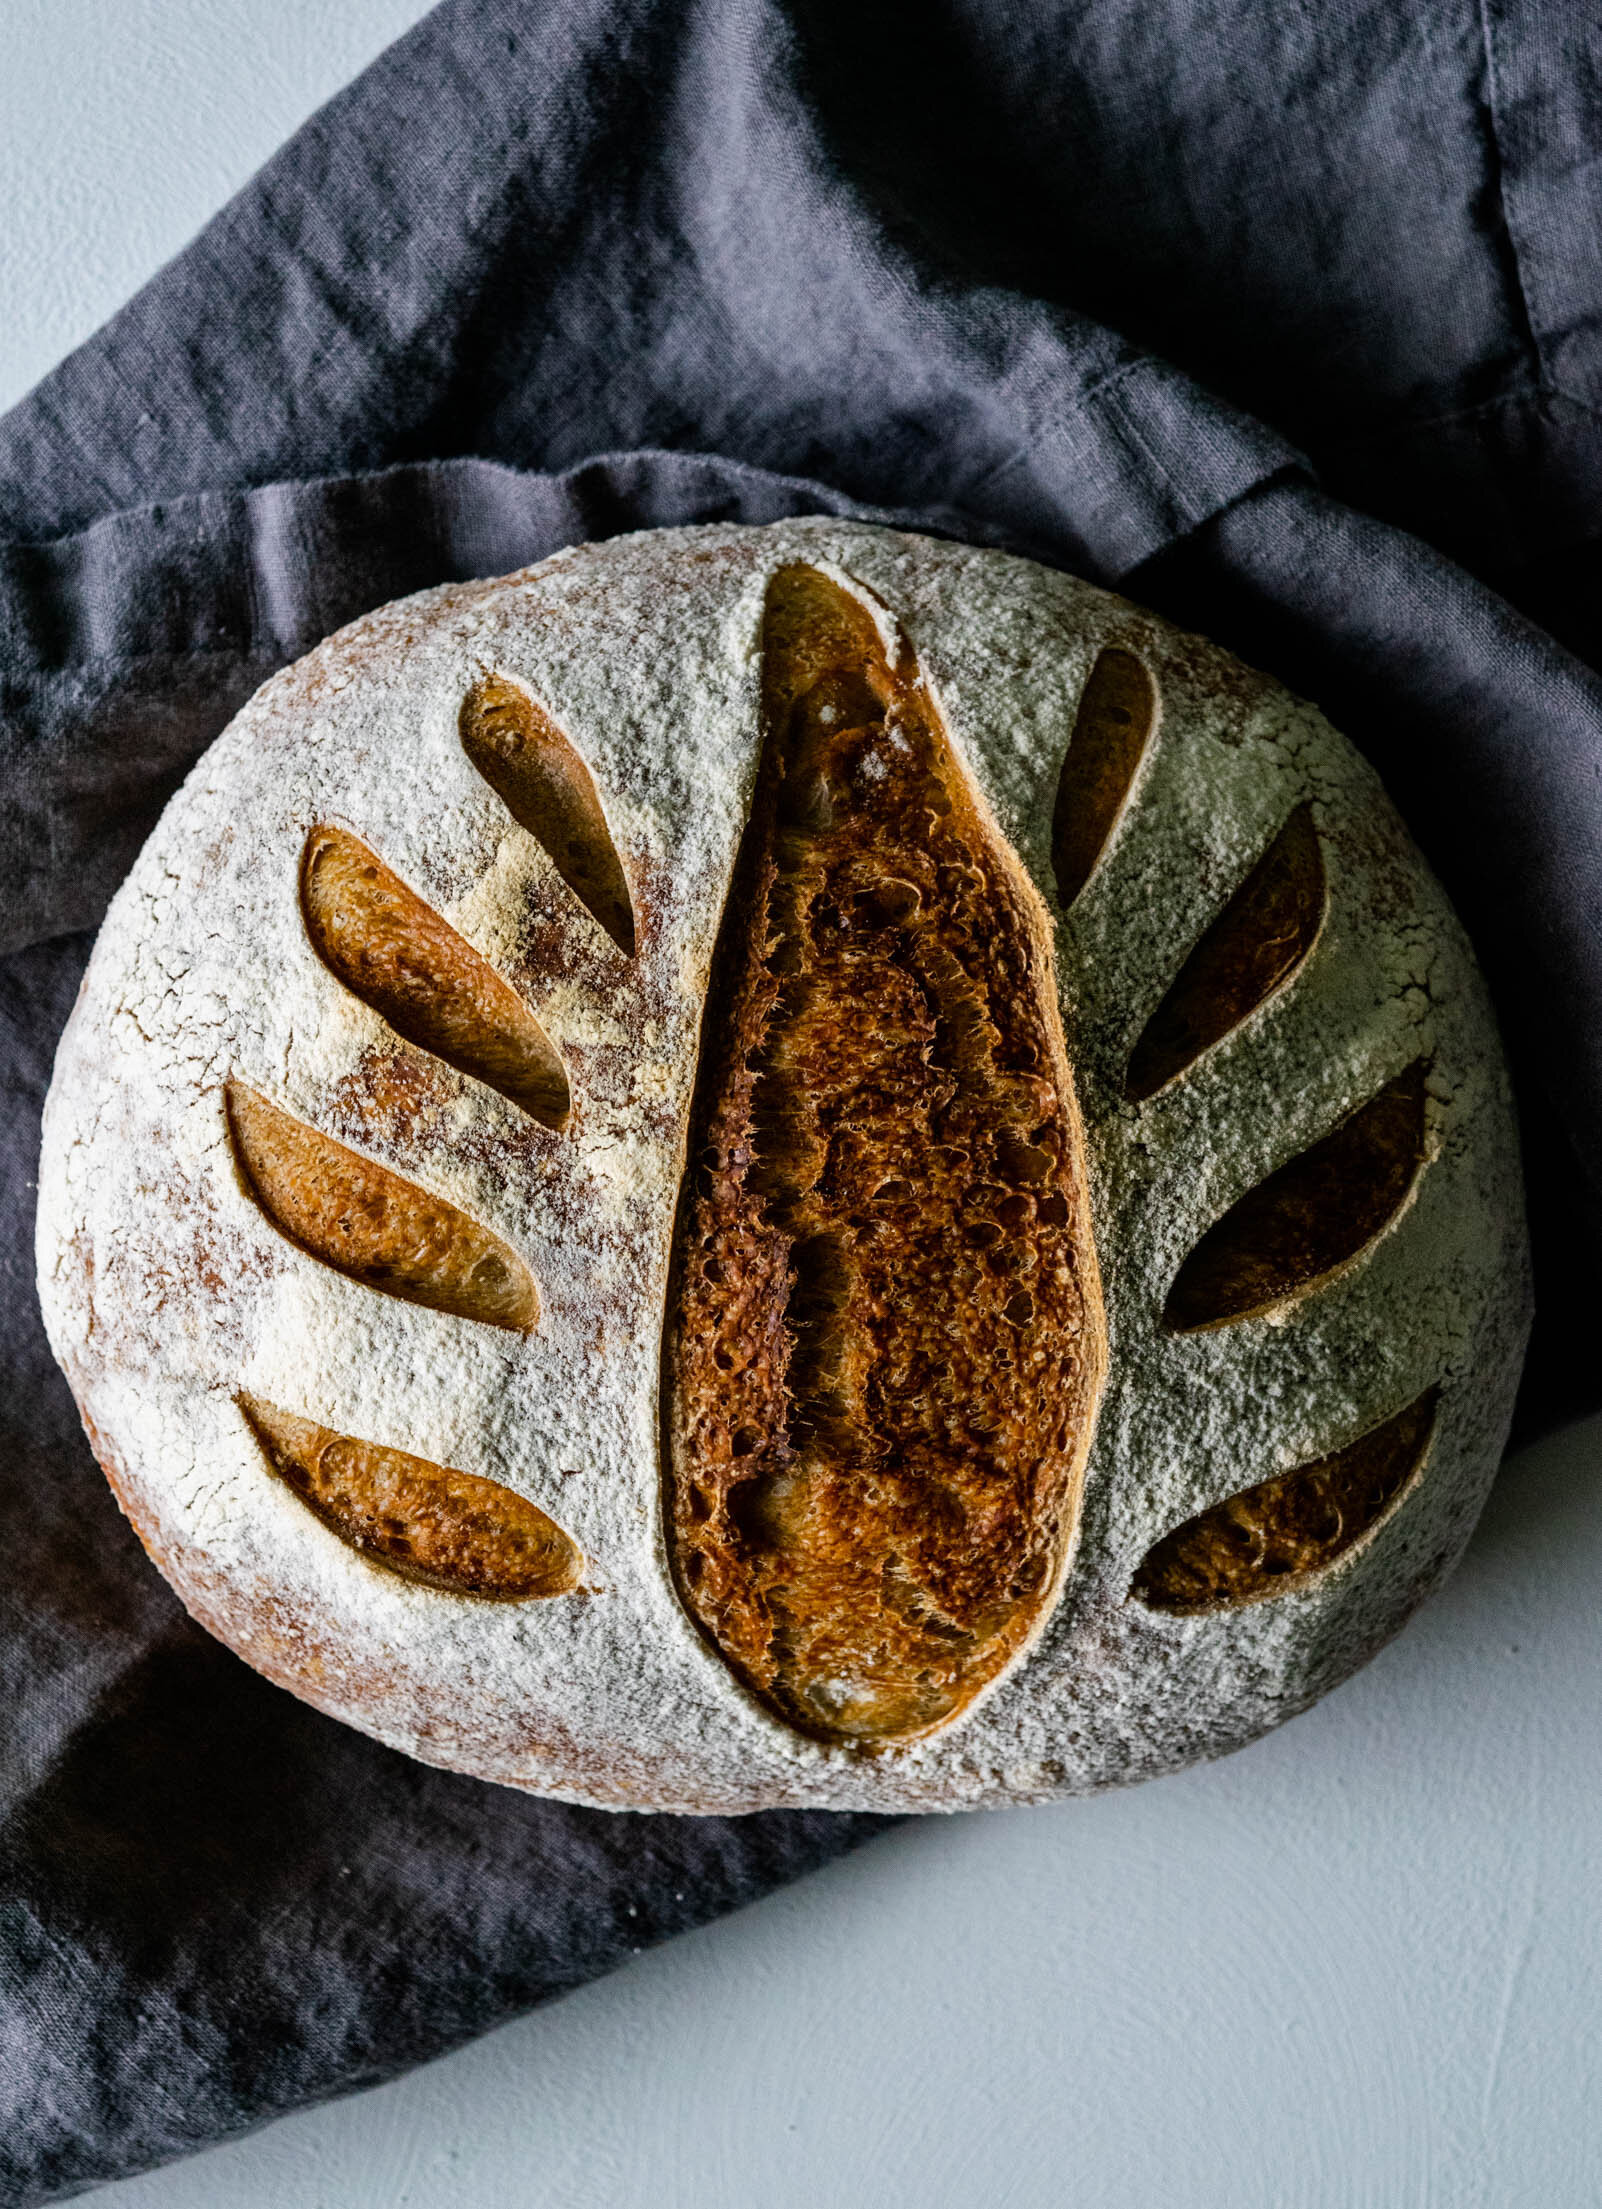
I think that 2019 should be the year of bread. Over the last year or so, I’ve been wading into the homemade artisan bread pool and this year I’m diving in head first. (Two of my actual 2019 goals are “regular bread making” and “make more croissants” so obviously, I have a great handle on my priorities.)

We are starting off with this classic artisan sourdough, which is a naturally fermented bread. This means that the leavening (and sourdough flavor) come from naturally occurring yeast, not active dry or instant yeast you can get at the store and also means that you will be working from a sourdough culture or starter. If you don’t yet have your own little starter, jump on over to my Sourdough Culture How To for a full rundown on how to start your own. (Mine is named Pierre and he is now an integral part of our family).

I’ve been tweaking and testing this process to try and get it right so that even the most novice bread bakers will have success and I’ve learned most of my gluten handling skills from Chad Robertson’s Tartine Bread and Tara Jensen’s Baker Hands. Bread making is a special process because although it is very precise and measurement-reliant, it is also a very tactile and intuitive process. It was a little difficult to write this process out because the more you bake, the more you rely on the feel and look of the dough. Over the next few weeks, I will be working on creating an Instagram story that follows my bread process to help out in the visual department. Making your own bread is not a quick and easy adventure, but I promise that when you bite into your first craggy piece, it will all be worth it and you will be running back to your kitchen to do it all again.

BarnSour6.jpg

Recipe updated 3/14/20: Since posting my original sourdough recipe, I’ve continued to play with the ratios and flours used. I also spent part of my summer at the restaurant baking loaves of sourdough everyday for the resort and my sourdough skills have improved greatly. This recipe will probably always be evolving as I discover new flours and play with hydration ratios, but this updated recipe has been honed and perfected and is my regular, everyday sourdough.

Classic Sourdough Bread 

Yield: 2 loaves

Ingredients: 

For the leaven: 

100 grams starter

200 grams water 

200 grams bread flour


For the bread: 

620 grams bread flour

60 grams whole wheat flour

24 grams kosher salt

2 grams active dry yeast

500 grams water, 75-80°F

270 grams leaven (see above recipe)


Procedure: 

The night before baking, make the leaven: 

  1. In a large plastic bowl, stir together 100 grams of your starter, 200 grams of water, and 200 grams of bread flour. Cover (I like to use plastic wrap and a rubber band) and let set on the counter overnight. 

To make the bread: 

  1. In a large bowl, mix together leaven, warm (75-80 degree) water, and yeast and stir gently. The leaven will begin to break up leaving you with a cloudy water. 

  2. Add the bread flour and whole wheat flour and stir to combine, until there are no more streaks of flour and you have a rough dough. Cover the bowl with a dish towel and let rest for 30 minutes. (This period is called autolyse and it allows the flour to absorb the water before the addition of the salt, which is hygroscopic and will soak up the water immediately.)

  3. After your autolyse, add the salt. I like to sprinkle the salt over the dough and pinch it in distribute. Using your fingers and a bowl scraper, work the salt into the dough. You will feel the dough tighten a bit and develop tension as the salt mixes in.

  4. At this point, you can transfer the dough to a large clear proofing container, if you have one, or to a clean bowl. Cover the bowl with the dish towel and place in a warm area of your kitchen. This is the bulk fermentation period. The dough will proof for about 3 hours, during which the yeast will begin creating rise and gas bubbles. We won’t knead the dough, but it will undergo a series of folds which help strengthen the gluten development. When folding, take care not to crush all of the little gas bubbles forming in the bread- we want to keep those! 

  5. Proof the dough on the counter for three hours, turning every 30 minutes. To complete a turn/fold: grab the bottom of the on side of the dough and stretch it up and over to the other side of the rest of the dough. Turn the dough 90 degrees and repeat until you have folded all four sides of the dough. This is considered one turn. Cover and continue to proof, repeating the turn every 30 minutes (for a total of 5 times). 

  6. After 3 hours, the dough should have noticeable bubbles and should have slightly puffed and increased in size. Turn the dough out onto a well-floured work surface and divide it into two pieces. Dust the top of one dough piece with flour and fold the cut side onto the dough. Use your floured hands and a bench scraper to shape the dough piece into a round. By the end of shaping, your dough should have a taught, smooth outer surface. Repeat with the other dough piece, cover bowl with the dish towel and let rest for 20-30 minutes. 

  7. After this resting period, you will form the final shape of the dough and transfer it to proofing baskets to complete its final rise. To shape the dough, use your bench knife to flip your round over on the surface, so that your smooth side is down. This will be the outer crust of your bread. Gently pat the dough into a rough rectangle shape. Grasp the bottom lip of the dough and fold it up, about 2/3 of the way, like you are folding a letter. Press the edge into the dough. Grasp the right side of the dough, stretch it out and over so that it crosses to the left side. Repeat this with the left side. You should have an envelope looking dough shape now. Grab the top side of the dough, stretch it out slightly and fold it over the entire package like you are closing an envelope. Take hold of the dough nearest to you and flip the entire package up and over (away from you) so that all of the seams are on the bottom. Let rest while you repeat this with the other dough piece. 

  8. Dust your proofing baskets with a good amount of flour* and transfer your dough to the baskets, so that the smooth side is facing down and the seams are upright. Cover with a dish towel.

  9. At this point, you have two options for final proofing. You can either proof both loaves traditionally, on a warm countertop for about 3 hours, or you can wrap the loaves and transfer them to the fridge to cold proof for 8-12 hours. 

To bake the loaves: 

  1. When you are ready to bake the loaves, place a large Dutch oven with a lid in your oven and preheat to 500 degrees. You want the Dutch oven to be very hot when you add your bread to it.  

  2. When your oven and pot are preheated, carefully remove the Dutch oven. Flip your dough out of the basket onto a piece of parchment paper. Quickly, use a knife or a lame to score the top of your dough and then grab the sides of the parchment paper and carefully lower it into the Dutch oven. Place the lid back on the Dutch oven and bake for 20 minutes, covered. 

  3. After 20 minutes, carefully remove the lid from the Dutch oven and lower the oven temperature to 450 degrees and bake for another 15-20 minutes. The bread is done with the top crust is deeply browned and the bottom has a hollow-side when you tap it. 

  4. Before repeating with the other loaf, let the Dutch oven preheat again in the hot oven.